Showing posts sorted by date for query cupcake. Sort by relevance Show all posts

Tuesday, January 15, 2013

shabby apple giveaway winner!


Thanks to all of you who participated in the Shabby Apple $50 giftcard giveaway! Even though there is only one winner, don't forget that Shabby Apple is giving all Pink Cupcake Vintage readers
10% off until January 31st.  Just use code {pinkcupcakevintage10off} at checkout.

And the winner is...................TIFFANY of @hellopengy!

Congratulations! For details on how to collect your gift card, email pinkcupcakevintage@gmail.com.


Monday, June 13, 2011

the closet shop: summer honey (part 1)


Brooke decided to do a Closet Shop short film! We had so much fun! Stay tuned the next few weeks for more! Also, I now have a Pink Cupcake Vintage youtube channel! I'm hoping to post a few hair and makeup tutorials soon!

Location: My Kitchen

Dress: Tulle4us
Earrings: ???
Bracelet: ???
Shoes: Payless
Apron: gift

Wednesday, June 1, 2011

bites from the big apple

I had the most amazing time in NYC! Here are a few of the highlights from my trip! 

If you can get yourself to the Met by August 7th, you must! The Alexander McQueen exhibit is one of the best pieces of art I have seen in years. It was life changing.

Getting to see my friend Christopher J. Hanke on Broadway in How To Suceed In Business alongside Harry Potter. Also, Sarah Jessica Parker and Matthew Broderick were sitting right in front of me. Getting to hear her laugh not to mention stare at her chic style all night, was the ultimate bonus! Christopher does a vlog for Broadway.com and is the cutest. Check him out!

Finally getting to sample some of the yummy Gluten Free goods at Babycakes NYC. Yes that is a doughnut, chocolate chip cookie, and a cupcake.

Scoring some vintage treasures at my new favorite vintage store, Beacon's Closet.

Spending time with one of my all time fave friends, and make up artist! She had just given me a makeover!

I'm already planning my next trip!

Wednesday, May 18, 2011

guest blogger: gen of gen's favorite

I'm not sure what more I can say about Gen! She is brilliantly creative, has one of the best eyes in the design world, and now has a beautifully inspirational blog to catalog all of her finds. If you are a follower of pink cupcake vintage, you have seen many a post about Gen's store Favorite, and how she has helped me time and time again reinvent my spaces. I'm so happy to have her share a little inspiration and where to find it on a budget! Thanks Gen!
 
My latest obsession is this fabulous house featured in the new issue of Lonny! It is the perfect mix of "vintage+feminine" meets a cool "modern+eclectic" vibe!  Which of course reminds me of my dear friend- Melodie!! 


So, when Melodie asked me to do a guest blog for pink cupcake vintage... I could not resist sharing with you some pieces inspired by this amazing home and the and the equally fabulous Melodie!!!

All found, at one of my "favorite" spots for inexpensive, quirky, and  easily accessible home goods: Urban Outfitters!!!!


Tuesday, May 17, 2011

guest blogger: katie of county faire

When I first saw Katie, I remember asking Mr. Matty who she was because I had never seen anyone with that cool of style. She continues to wow me with her insane creativity, gorgeous art skills, and amazing blog posts on County Faire. What I love about County Faire is that every outfit she posts is under $100.00. I love seeing all of her amazing finds and have even bought a few she has suggested. Here is a retro inspired outfit she did just for my Pink Cupcake readers!


swimsuit / shorts / sunglasses / shoes // total $99.52

Tuesday, April 19, 2011

oh my!

I've died and gone to "treat heaven".  Cotton Candy on a CUPCAKE! Yes please!

{via Oh Joy}

Wednesday, February 16, 2011

can't stop eating

I look forward to Valentine's candy each year because of these! Cinnamon Imperial Hearts! Don't be fooled, these are not the same as red hots. They are smaller, sweeter, and the perfect topping for a cupcake. I just need them out of my house!

Wednesday, November 17, 2010

a cupcake dress


Forget raindrops on roses and whiskers on kittens. My favorite thing is a dress made of cupcakes.

(via the cupcake blog)

Thursday, September 16, 2010

don't forget


If you live in Nashville, come to the Pink Cupcake Vintage trunk show tonight from 5:30-8pm or Saturday from 10am-1pm! Click here for more details. There are some really great pieces for women and children, including this Victor Costa stunner!

Friday, August 27, 2010

you're invited


I am so excited to be throwing my very first trunk show for Pink Cupcake Vintage. I will have lots of vintage goodies for children and women! Need a baby gift? Or better yet, a really great Fall outfit? If you live in Nashville, come check it out and bring a friend! View full event details here.

Friday, August 13, 2010

my friend is talented: rebekka


Lately I have been wanting to spotlight all the talented friends I have, so I decided to start a "my friend is talented" monthly post! This month it is dedicated to my friend Rebekka. This gal is who I want to be when I grow up! She is an amazing chef, cupcake baker, clothing maker, designer, and painter! You may remember her as the gal who made aprons for her adoption. Well she has begun a new venture and it involves her talents as an artist and painter. Rebekka is painting original designs and then having them printed on a smaller scale for girls like me and you! I can't wait for her to open up her etsy shop so I can scoop up some telephone notes! The most exciting part is that she is coming over this weekend to paint "Doris" and I am hoping to turn her design into our very first t-shirt for Tin Can Treats! Rebekka thank you for being such an encouraging friend and source of inspiration to me!

Thursday, May 13, 2010

DIY: vintage paper cupcake liners


Oh my goodness! When I saw this wedding photo shoot, I instantly fell in love with every detail, especially the vintage paper cupcake wrappers! Lucky for me, the cake designer gives a DIY tutorial on how to make them here.

Wednesday, April 21, 2010

meet becky homeecky

Megan and I met performing about 10 years ago and we have been fast friends ever since. Megan is one of those gals that is good at everything..and I mean everything! I am constantly amazed how she flawlessly gets it all done! Not to mention, she is one of the funniest people I know. Like, spit out your coke funny! A friend of ours nicknamed Megan "becky homeecky" and this post is an example of why.

Hello there, fellow friends-of-Melodie! As an avid reader of Pink Cupcake Vintage, I was delighted when Mel asked me to guest-blog (even though I'm definitely one of the least interesting people she knows. I reminded her of that, and she STILL wanted me to join in - how nice is that?) So I'm here to help keep the ball rolling while Mel and Matty style-bomb Texas and enjoy some R&R. I have been tasked with putting together a DIY tutorial on some crafts I recently made for our wonderful friend Olivia's baby shower. On with the show!
How to make (cute! inexpensive! easy!) pom-poms:


What you will need:
2' length of twine (you can of course go longer or shorter with this, depending on how you're displaying them - I recommend allowing at least 18" for the pom-pom itself, though; and if you're not into twine, the stringing material can be yarn, thin ribbon, or anything you like that's sturdy without being too bulky)
large sewing needle
coffee filters (roughly 50 per pom-pom, and any size filter will work. For this project I opted for the super-big-industrial size; I could use my leftovers to make coffee for everyone at the VFW Hall.)
*Friendly supplies tip - don't even attempt this with plain thread or a wimpy needle, unless you just want to just go ahead and empty your wallet into the swear-jar*

Step One:
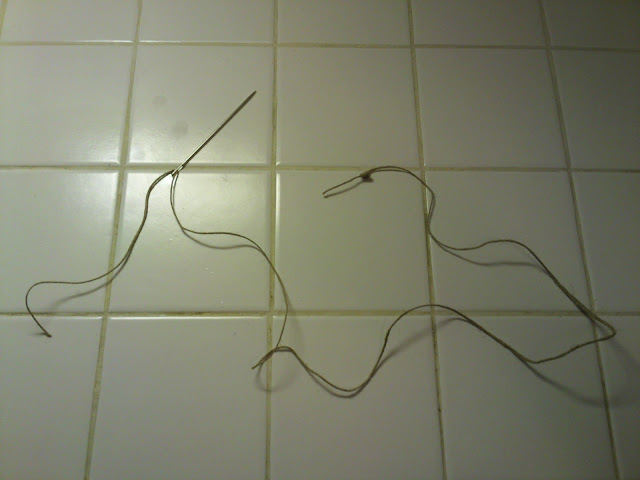
Knot off one end of your twine. Make sure the knot is substantial - it will be invisible once your pom-pom is made, so it doesn't have to be pageant-ready. Thread the other end through your big giant needle.

Step Two:
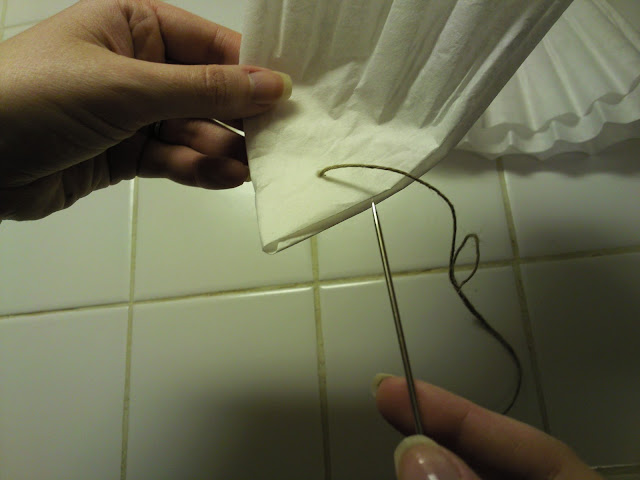
Grab a filter and get going. Fold your filter up into a loose quarter or sixth - the fluffier you can leave it, the better it will look when assembled. Pierce through it about an inch away from the pointy tip and string it down to the ugly-twine-knot.


Step Three
:
Lather, rinse, repeat. Every ten filters or so, squish them all down tightly against the knot and spread them out if necessary. It's easier to shift them around in small sections than all at the end.
Step Four:
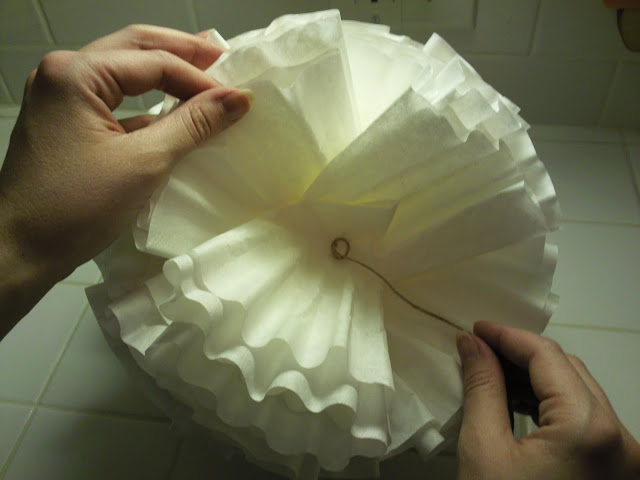
Keep on keeping on until you've reached your desired size and shape. Tie that sucker off as close to the top filter as possible so your creation maintains its shape, and voila! Pom-pom city.


Step Five:
Sip your beverage and admire your handiwork. Ignore your husband when he tells you that this one looks way better than the ones you made with the plain thread and wimpy needle.


Step Six:
Hang or place your pom-pom(s) somewhere that your guests can enjoy them.
And that's all there is to it! Projects don't come much easier or cheaper than this, which is why I know how to do it. Have fun stringin'!

Tuesday, April 20, 2010

DIY with kayce hughes

Kayce Hughes needs no introduction. If you haven't taken the time to look at her blog or her clothing line, you are missing out. She is an amazing wife, mother, designer, and someone I am happy to call friend.


I was thrilled when Melodie asked me to be a guest blogger for pink cupcake vintage. She thought you would like something about my home. With the sunny skies and perfect temperatures we have had lately I have moved to our screened porch. I thought I would share how we made the big flag (5 feet by 37inches) over the mantel. I think it would look equally wonderful inside or instead you could make it a union jack.

1.We went to home depot and had 4 1x10 pine boards cut all 5 feet long.
(The more knot holes the better)

2. On a flat surface lay them side by side. Use 3 1x4¹s to hold the boards
together. These can be nailed or screwed it. The big boards are horizontal and the 1x4¹s are vertical.

3. Sand the edges of the flag.


4. Draw your outline (stripes etc.) in pencil on the wood


5. Prime the front and sides of the flag with orange shellac. This should
dry in about an hour. (This will make the wood a little darker. If you want the wood to be really dark you could stain it first and then seal with the orange shellac)

6. Paint the front of the flag with crackle medium. Follow the instructions
on the can. When it is dry you paint on your red, white and blue. The variations in brush strokes and thickness of paint will give you different effects. Enjoy the process and don't worry how it is looking. We are going for rustic here. You might want to do the red and let it dry before doing the white. You don't want to have the wet colors touch each other.

7. When the blue is dry you can add the white stars. I did mine free hand
but you could also try a stencil.

8. When it has been dry for a day you can add a layer of paste wax made for
dark furniture. Follow the directions on the can. But basiclly you add a thin layer with an old cloth, let it dry for 20 min and then polish.

9. If you need a different size just use smaller or less boards.


10. Happy Painting.

Monday, April 19, 2010

a you are my fave post is my fave

I'm not sure how I found youaremyfave, but it is one of my daily reads! Melanie is the genious behind the "pinata in the mail". If you haven't found her blog yet, you will instantly be hooked!


IMG_1022

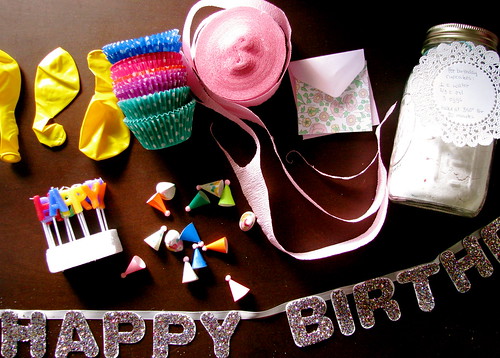
One thing I know Melodie loves is parties, so I've put it in a convenient little package for her. My sister recently had a birthday and I got her a cute headband. When I laid it in the box ready to send it it just looked, well, pathetic. I wanted her to be able to open the package and say, "Hot dog!" instead of, "Oh that's nice. When does Law and Order come on?" So I came up with this birthday in a box. Items included (in case it isn't clear from my stellar photography skills): rainbow cupcake mix, sunshine balloons, birthday candles, mini party hats, polka dotted cupcake liners, crepe paper and a glittery banner. Happiness can come in package form.

Wednesday, January 6, 2010

newness

I am happy to say that this weekend the Pink Cupcake Vintage shop will re-open with not just children's vintage, but women's vintage and a few home goods soon to follow! Stay tuned for more updates later this week! A super huge thanks to Jessica at Hat Box Studio for my new logo design.

Thursday, October 15, 2009

thrift score thursday


Last night, I scored a handful of these disposable cupcake towers for 99 cents at Old Time Pottery! With a little spray paint they will be party ready in no time!

Tuesday, June 9, 2009

advertising


For information on Pink Cupcake Vintage advertising and sponsorship rates please email Melodie at pinkcupcakevintage@gmail.com

Wednesday, May 13, 2009

movie night cupcake


How brilliant are these? You could theme a whole party around them! Get how-to instructions here.

Monday, March 9, 2009

pig? no pingg!


Thanks to designmom for spreading the news about pingg.com! Evite just got served! Now you can send free email invites without sacrificing style. Check out the latest designs by Martha, they are beautiful. My favorite of course is the cupcake! I usually hate the idea of sending out email invites, but with these cuties, I would bend my rules.
Pin It button on image hover